

Inventory Setup
After establishing your Neon Shop, you'll want to add offers for sale and group those offers to help players navigate your Neon Shop. You can either do this via the Console, or manually via the Inventory Management API.
Here, in this article, we'll focus on using the APIs.
Prerequisites
Before reading this doc, you can familiarize yourself with how we handle images, how we manage translations, and how we internationalize prices:
You'll also need an API key for the environment you want to modify. API changes are made immediately, so make sure to test any critical changes in your sandbox environment before modifying production.
API Objects
First, let's discuss the key models that make up the Neon Shop.
Offers are purchasable goods, like a shield or a package of 500 gold. When a user makes a purchase, they're buying an Offer, and that Offer's unique SKU is what's used to fulfill the purchase on your servers after the purchase is complete.
Offers consist of Items, which are the basic unit of any purchase, like gold or gems. Every Offer consists of one or more Items in various quantities; for example, a package of 500 gold would consist of 500 units of the "gold" Item. (A Shield Offer would consist of 1 unit of the "shield" Item.) Items are only used for display purposes; by defining the concept of "gold" with a singular and plural translation, you can easily generate offers like "500 gold" or "1,000 gold" on the fly. There is no limit to the number of items that an offer can have.
Finally, Offers are organized into Offer Groups, like featured items or limited-time purchases. Every Offer can be associated with one or more Offer Groups.
Creating your first offers
In this walkthrough, we're going to build your Neon Shop from scratch. In the next section, we'll discuss how to manage your store once it's up and running.
Prerequisites
Before you begin, make sure to have the API key for the environment you want to modify. Changes made with your production API key will impact your live, user-facing store, so it's strongly recommended that you set your sandbox environment up first.
Next, you'll need to upload any item or offer images you want to use to our servers via the Assets API, more information about this API can be found in the Offer Images section. Keep the filenames you used on hand (or use the GET endpoint to list them), as you'll refer to these file names when setting up your inventory.
Finally, if you plan to use a custom pricing sheet, make sure to have the tier codes you want to use for your offers available. For more about pricing sheets, see here.
Items
First, we need to create Item objects. Item objects are used to build offers, and should generally consist of single units of purchasable goods. You can create these objects by calling the POST /storefront/items API:
curl --request POST \
     --url https://api.neonpay.com/storefront/items \
     --header 'X-API-KEY: <your API key>'
     --header 'accept: application/json' \
     --header 'content-type: application/json' \
     --data '
[
  {
    "code": "<code>",
    "imageFileName": "<image file name>",
    "text": {
      "<locale">: {
        "nameSingular": "<singular name, e.g. "gem">",
        "namePlural": "<plural name, e.g. "gems">",
        "description": "<description>"
      }
    }
  }
]
'
Remember to replace <your API key> with the correct API key for your environment.
code is a unique string that you'll use to refer to the Item object via the API, for example to add the item to an offer.
imageFileName is the file name for an image associated with this item without a specific quantity attached. It must be the same as the file name you used when uploading the image file via the assets API, and must correspond to a file that is not marked for deletion.
Item images and descriptions are only shown in the Shop if an item is part of an offer that contains other items, like a bundle with a mix of gold and gems.
Please note: POST /storefront/items and POST /storefront/offers are both create endpoints, so if you pass any items or offers that already exist, you will receive a 400. If you don't want to create offers or items, you can update an item by code or update an offer by SKU.
Offer groups
Next, we'll create the Offer Group objects that your offers will live in. (If you don't plan to organize your offers into groups, you can skip this section.)
You can create Offer Groups by calling the POST /storefront/offer-groups API:
curl --request POST \
     --url https://api.neonpay.com/storefront/offer-groups \
     --header 'X-API-KEY: YOUR API KEY'
     --header 'accept: application/json' \
     --header 'content-type: application/json' \
     --data '
[
  {
    "code": "<code>",
    "priority": <priority>,
    "text": {
      "<locale>": {
        "label": "<label>",
        "description": "<description>"
      }
    }
  }
]
'
Remember to replace <your API key> with the correct API key for your environment.
code is a unique code you'll use to refer to each Offer Group object via the API, for example to add an offer to an offer group.
priority is an integer used to sort offer groups on the page. The lower the number, the earlier on the page the offer group will appear. Ties are broken arbitrarily, so make sure to use different priorities for each offer group.
All of the fields in text are optional. An Offer Group object without a label or description will have spacing, but no text, between it and its neighbors.
Offers
Finally, we'll create the actual offers by calling the POST /storefront/offers API:
curl --request POST \
     --url https://api.neonpay.com/storefront/offers \
     --header 'X-API-KEY: <your API key>' \
     --header 'accept: application/json' \
     --header 'content-type: application/json' \
     --data '
[
  {
    "sku": "<sku>",
    "priceTierCode": "<price tier code>",
    "imageFileName": "<image file name>",
    "items": [
      {
        "code": "<item code>",
        "quantity": <quantity>,
        "text": {
          "<locale>": {
            "subtitle": "<subtitle>",
            "highlightedSubtitle": "<highlighted subtitle>"
          }
        }
      }
    ],
    "groups": [
      {
        "code": "<code>",
        "style": "<default | featured>",
        "order": 0
      }
    ],
    "text": {
      "<locale>": {
        "name": "<name>",
        "description": "<description>",
        "bannerText": "<banner text>",
        "subtitle": "<subtitle>",
        "highlightedSubtitle": "<highlighted subtitle>"
      }
    },
    "isTargetedOffer": false,
    "shouldPreviewTargetedOffer": false,
    "timeLimits": {
      "previewDate": "2023-01-01T20:00:00.000Z",
      "startDate": "2023-02-01T20:00:00.000Z",
      "endDate": "2023-12-31T20:00:00.000Z"
    }
  }
]
'
Remember to replace <your API key> with the correct API key for your environment.
sku is a unique code that corresponds to a SKU in your inventory management system. You must be able to map this value to the object in the game, so that you can credit the user's account when they make a purchase. See here for more information on how Neon fulfills offers using this SKU.
priceTierCode is the tier code in your pricing sheet corresponding to this offer. See Pricing for more details.
imageFileName is the file name of an image of this offer. It must be the same as the file name you used when uploading the image file via the assets API, and must correspond to a file that is not marked for deletion.
Offer items
items defines the set of Items included in this offer. At minimum, an offer must contain at least one item.
code is the item code you defined when creating the Item object.
quantity is the amount of this item included in this offer.
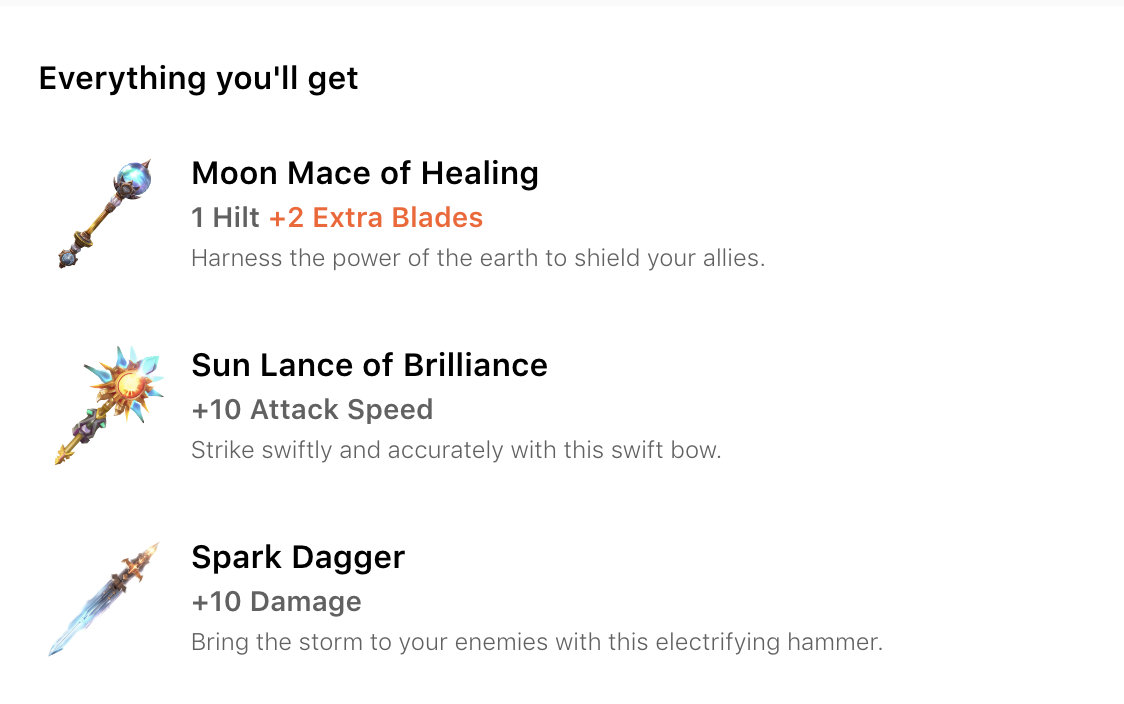
For offers that contain more than one type of item, you can also define item-specific subtitle and highlighted subtitle values displayed alongside the item-specific text. For example, in this bundle, 1 Hilt is the subtitle value for the moon_mace object, and +2 Extra Blades is the highlightedSubtitle value. The name (Moon Mace of Healing) and description (Harness the power of the earth) are defined on the Item object.
Offer groups
groups controls which offer groups this offer is a part of.
codeis the offer group code you defined when creating the Offer Group object.styledetermines how the offer is displayed within the offer group:defaultis the standard offer presentation, and takes up one unit within the row.promotedtakes up two units in the row, and is full-size on smaller viewports.
orderdefines the relative position of this offer within its offer group; the lower theorder, the earlier the offer shows up in the group. Ties are broken arbitrarily, so use unique values when definingorder.
Offer text
The text field defines a few different strings used to display the offer:
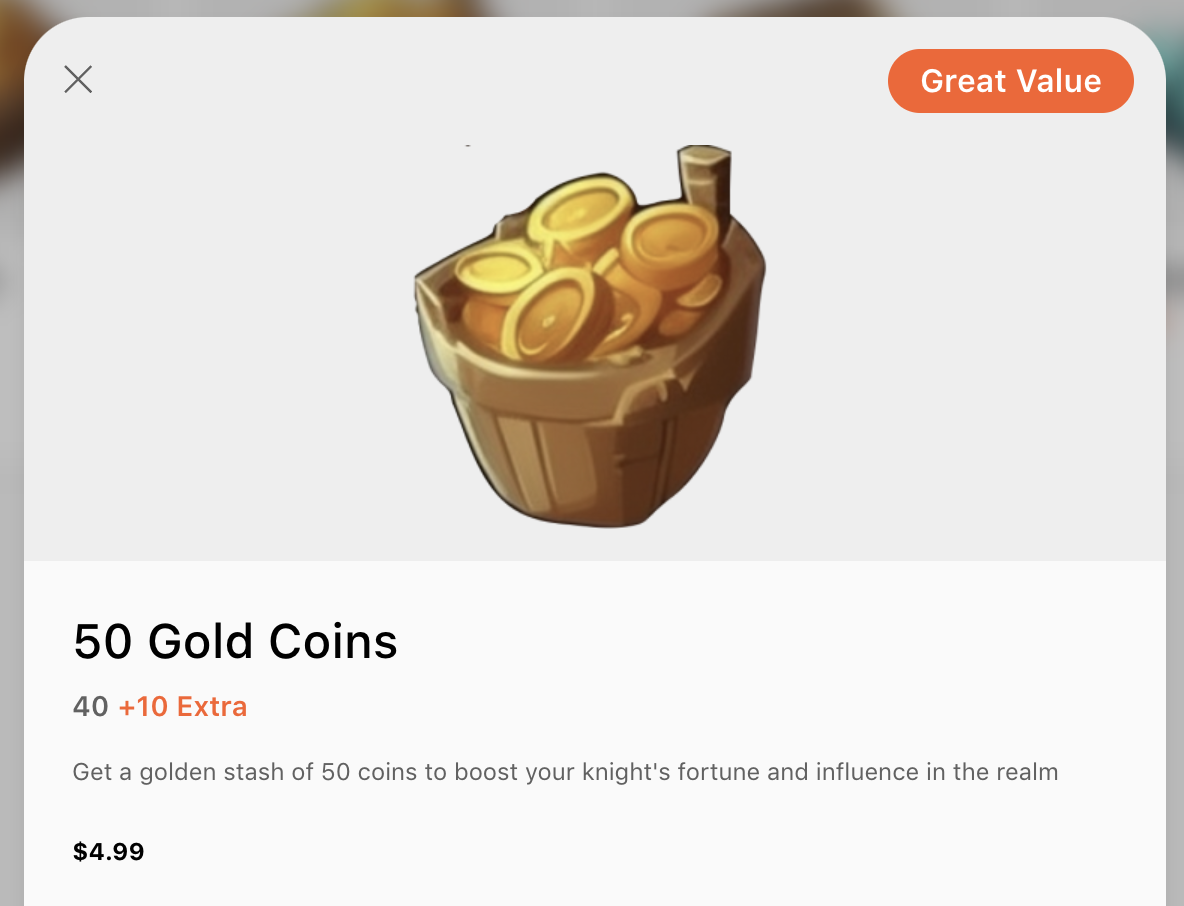
name(50 Gold Coins) is the name of the offer, displayed prominently in the Neon Shop and throughout the checkout process .description(Get a golden stash of 50 coins...) is a short explanation of the offer's in-game benefits, only displayed in the item detail view .bannerText(Great Value) can be used to show a value prop for this offer, and is highlighted prominently throughout the Neon Shop.subtitle(40) andhighlightedSubtitle(+10 Extra) are short pieces of data explaining the relative value of this item, especially any bonus offers exclusive to the Neon store.
Targeted offers
isTargetedOffer controls whether this offer is a targeted offer, i.e., whether it should only be displayed to logged-in users who are eligible for the item.
By default, targeted offers are only shown to logged-in, eligible users. However, you can set shouldPreviewTargetedOffer to true to show the offer to ineligible or logged-out users, who will see it as a locked item and be unable to purchase it until they log in with an eligible account.
Time-limited offers
timeLimits can be used to schedule offers for display in the future:
- After
previewDate, the offer is visible in the store, but in a locked state and unavailable for purchase. - After
startDate, the offer is visible in the store and available for purchase. - After
endDate, the offer is removed from the store, and can no longer be purchased.
Hiding claimed offers
shouldHideOfferWhenClaimed can be used to control the display of claimed offers in the Neon Shop.
If the field is set to true for the offer, the offer will be hidden in the Neon Shop once the purchase limit or claim limit has been reached.
Managing your inventory
Now that you've set up your offers, you can visit your Neon Shop and make sure everything looks correct. If you need to make any changes, you can use the Console to update your inventory. You can also use the API to manually update individual objects.
Each update endpoint performs a full replacement, so you'll need to include everything you used to create the objects in addition to the updates you want to perform. However, the GET endpoint returns data in the same format as the expected input to the PATCH endpoint. Thus, you can make a GET call for a particular resource, use the response as the request body for a PATCH call, make the desired changes in the request body, and then execute the call.
Updated 3 months ago